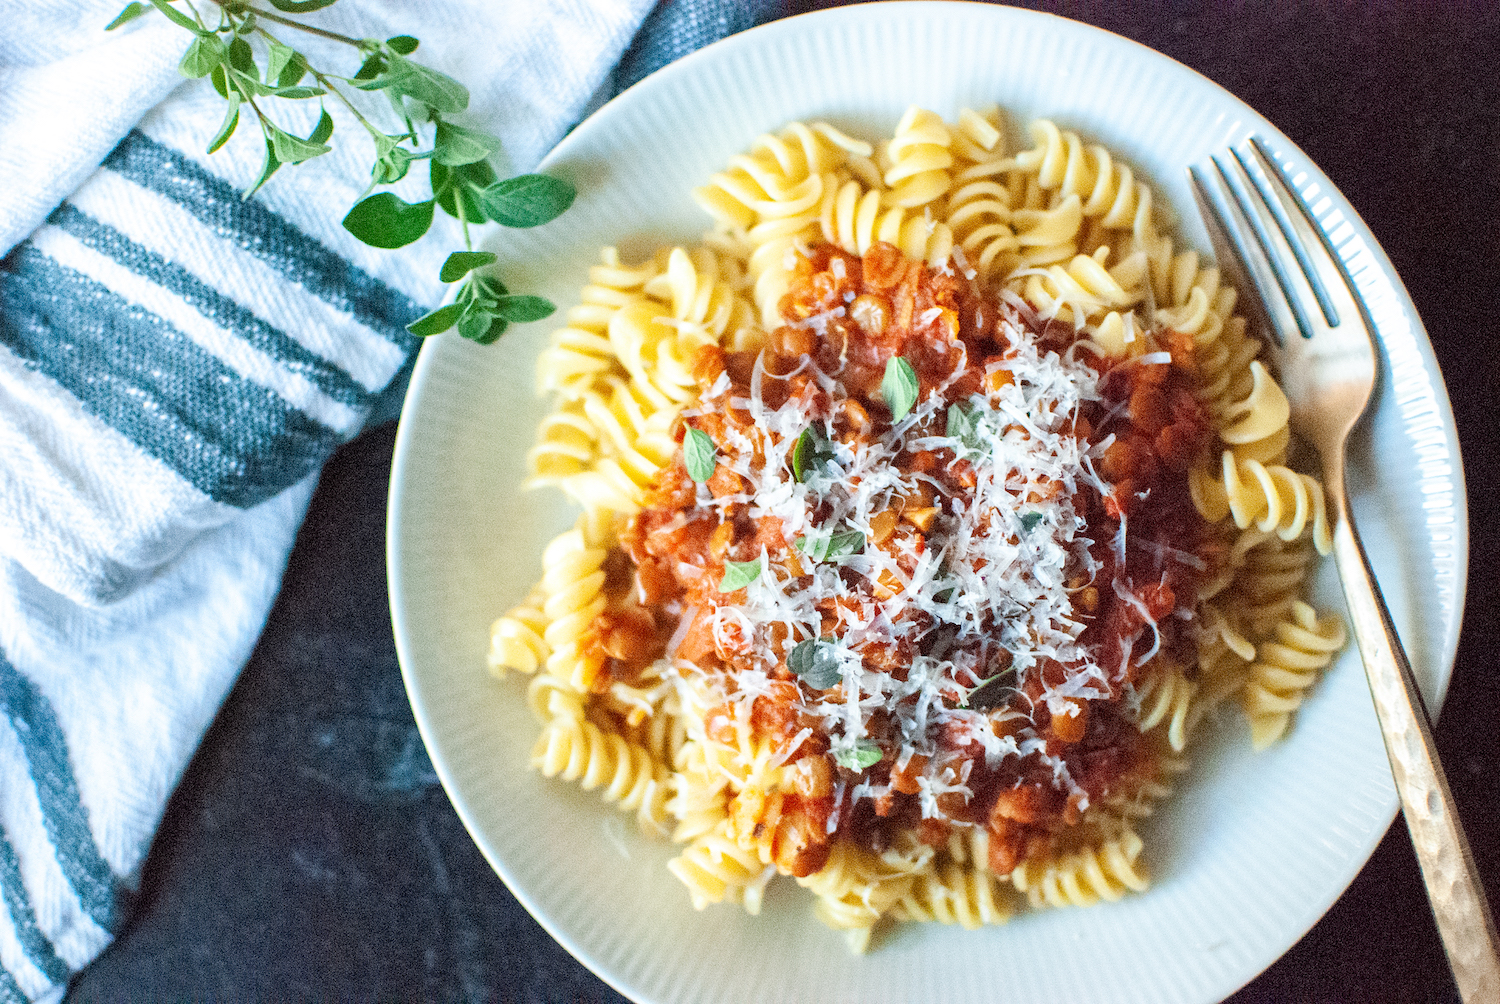
Ah, comfort food. The perfect companion to cold weather, stress, and our monthly cycles. (yup, I went there) When I was eating meat, bolognese was one of my favorite things to order at a restaurant. Talk about warm, delicious depth of flavor. Now that I’m plant-based, I’ve discovered that lentils can give you a similar savory indulgence. Hence, this deliciously easy lentil bolognese recipe.
When I first stopped eating meat, I wanted to make sure that I got enough protein in my diet. Lentils were a key item to increase in my diet. On nights I made spaghetti and meatballs for my family, I cooked-up some lentils on the side and added them to my marinara sauce. OMG… I was blown away by the savory goodness lentils can bring to pasta sauce.
Healthy Ingredients Make Lentil Bolognese Extra Special
Why lentils? They’re nutritional powerhouses with a host of benefits:
Protein – Lentils are one of the highest protein beans (second only to soy).
Fiber – a serving of lentils gives you a whopping 35% of your RDA of fiber.
Micronutrients – with high levels of potassium, iron, and folate, lentils have some phenomenal nutrients… especially for women.
The great thing about this lentil bolognese recipe is that every ingredient has purposeful, nutrient-dense properties.
Canned San Marzano Tomatoes – one of the healthiest varieties you can choose. Perfect for winter recipes when fresh tomatoes are not an option. You can get these at nearly any grocery store. I figure if you’re going to do canned, you might as well get the best… especially with a tomato-based sauce.
Caramelized Onions & Garlic – super good for your gut health and immune system. By caramelizing them in olive oil at the beginning of the recipe, you get an extra sweet & rich flavor profile.
Oregano – a wonderfully healthy herb that is an antibacterial agent, full of antioxidants and valuable phytonutrients. I use dried in the cooking process and then garnish with fresh from my garden.
1/4 teaspoon crushed red pepper flakes or to taste
1 cup uncooked lentils, thoroughly rinsed and picked through
1 (28-ounce) can crushed San Marzano tomatoes
2 cups vegetable stock or water
Instructions
Heat olive oil in a large pot over medium heat.
Add onion and cook until translucent, making sure to not burn it.
Add garlic, salt, and red pepper flakes, cook until the garlic softens, stirring frequently.
Add lentils, tomatoes, and water. Stir to combine.
Increase heat and bring the sauce to a rapid boil. Then, reduce heat, cover, and simmer for 30 to 35 minutes or until the lentils are tender.
Serve over pasta, or scoop onto crostini and eat like warm bruschetta
Notes
For my Vegan friends out there… I even used Vegan parm in my version. Yum)
You can cook the sauce in just one pot. Comes together in about 35 minutes.
If you have meat-lovers in your family, you can easily substitute ground beef in the recipe. I’d add it right after the onions and garlic are caramelized.
If you have both plant-based and meat-eaters, make the sauce without the lentils. Cook the lentils and meat separately and then add to the sauce for each person. (I’d rather take an extra step to adjust to folks’ desires vs. make food a drama point in our day.)
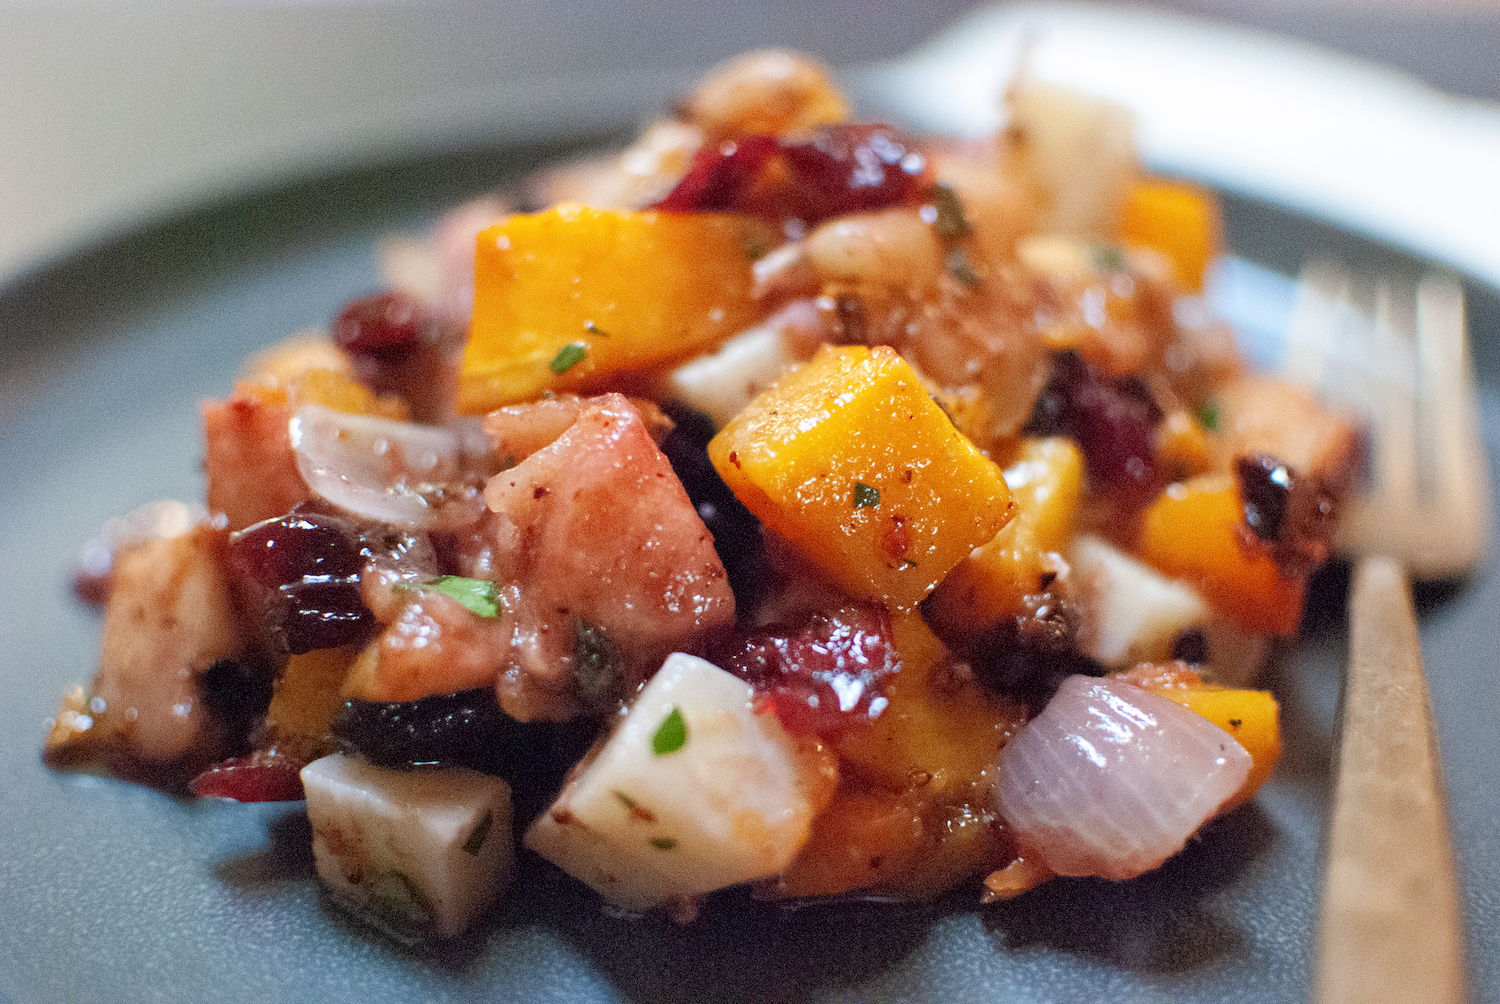
Looking for a fall or Thanksgiving side dish that goes beyond the ordinary? This Roasted Butternut Squash & Apple Salad will fit the bill. It dishes-up a perfect balance of roasted fall comfort, with a tart cranberry vinaigrette.
As a bonus, it is served a room temperature, so it doesn’t add complexity to meal prep. (a winner in my books) Plus, since it is so unique, it doesn’t have to ‘de-throne’ any other family favorite recipes at the table.
My mom got this family-favorite recipe from a Chef Jose Sanchez. It is my FAVORITE part of the Thanksgiving table, so I will be eternally grateful to him!
This dish is also fantastic beyond Thanksgiving. In fact, after I made the recipe for this post, I stored the extra in the fridge and enjoyed it as a lunch salad for several days. Roasted butternut squash pairs extremely well with meat, but is also fantastic piled on-top of baby arugula.
(Note – if cutting into a butternut squash sends you into kitchen chaos, check out this post by the Minimalist Baker.)
Recipe Highlights
You’ll want to cube the squash, apples and onions first thing. Get them in the oven so you can work on the other elements.
Next, start the cranberry syrup, which will simmer down in the background (keep an eye on it, but you don’t have to stir constantly if it’s at the right temperature)
Chopping the toasted pecans and herbs will be an olfactory delight… I think I could do that forever! So basically, I’m encouraging you to enjoy 🙂
Once the roasted squash & friends are out of the oven and cooled-down to room temperature, you can toss all the ingredients together and enjoy right away. If you haven’t tried roasted squash, apples or onions together, give-it-a-go before mixing-in the other ingredients. The combination is really incredible and unique.
BONUS… try dipping a whole pecan or a chunk of Manchego into the cooled cranberry syrup. YUM!
You’ve gotta try this perfect, unexpected fall / winter salad. It’s a family favorite at Thanksgiving, but honestly… I can sit down with a plate of it at any time. Roasted squash, onions and apples provide a uniquely delicious base. Highlighted by tart cranberries, crunchy pecans and salty/sweet manchego cheese. The best part? You can make it ahead and serve it room temperature. Of course, it’s also delicious straight from the fridge.
Recipe Credit: Chef Jose Sanchez, who graciously shared the recipe with my mom.
Ingredients
Scale
1 small butternut squash, peeled and cubed
1 large sweet onion, peeled and cut into wedges
4 fuji apples, peeled and cut into wedges
1 cup toasted pecans, chopped
1/2 cup dried cranberries
1/2 cup manchego cheese, diced
2 tbsp apple cider vinegar
3 tbsp extra virgin olive oil, plus additional for roasting squash, onion, and apples
1 tsp chopped sage
1 tsp chopped parsley
1 tsp pumpkin pie spice (or cinnamon and nutmeg)
salt & pepper
Plus… Cranberry Syrup
2 cups cranberry juice
1/2 cup red wine
2 tbsp sugar
Instructions
Preheat oven to 350 degrees
In a baking pan, toss the first three ingredients with the olive oil and pumpkin pie spice. Bake in a 350-degree oven for 45-60 minutes till the squash is barely fork tender, but not mushy.
Let the roasted ingredients cool before adding other ingredients
Add the cooled roasted ingredients, plus chopped pecans, cranberries, manchego cheese, sage, and parsley to a large serving bowl
Drizzle with about 2 tablespoons of the cranberry syrup (see below) and stir to incorporate
Salt and pepper to taste
CRANBERRY SYRUP:
Place cranberry juice, red wine and sugar in a small sauce pan and reduce on medium heat to a syrup consistency. (You’ll end up with about 1/4 cup of syrup.)
Notes
You can serve the salad right away, or store in the refrigerator for up to three days. Longer than that, the manchego cheese starts to break down and the salad loses it’s complexity.
The recipe gives you about 2 tbsp of extra cranberry syrup. This is GOLD in a margarita or a glass of bubbly during the holidays.
It’s funny. I love pumpkin pie, but I’ve never ordered a pumpkin spice latte. (gasp) So, this season I decided to give it a try with a homemade pumpkin spice latte. Heck… pumpkin is excellent for you, as is cinnamon and soy milk.
After an extra-long, ice-cold morning hike recently, I was inspired to develop this recipe. I came home rosy-cheeked and a bit more hungry than I usually am in the morning. My typical cup of black coffee wasn’t going to be satisfying. I wanted something more substantial… something that screamed ‘cold late-fall morning.’
For some reason, pumpkin spice is what I was craving, so pumpkin spice was what I was going to try. I happened to have a can of pumpkin in the cupboard (because Fall) and knew I could make a homemade pumpkin spice latte work with the other ingredients I had on-hand. My goal was to make it as healthy, yet indulgent as possible.
Here’s my thought process around ingredients:
Pumpkin – I used canned pumpkin for this recipe. This gives you great nutrients, plus added fiber. If you’re cautious about cracking open a whole can, just note that you can store it in the fridge for a few days after opening. Plus, you can add it to baked goods and a phenomenal face mask (with honey). Win-win if you ask me.
Cinnamon – This yummy spice is an excellent anti-oxidant and anti-inflammatory. Plus, it is believed to reduce blood sugar levels, which is great since this recipe does have sugar. I didn’t have Pumpkin Spice Mix at home and feel the recipe doesn’t really need it.
Soy Milk – You can truly use the milk of your choice in this recipe. I’ve ditched dairy for some time now, so soy was a natural choice. Soy tends to ‘froth’ better than other plant-based milk. Plus, soy is great for nourishing your skin and supporting your body’s stress response via phytoestrogens.
Brown Sugar – Of course, I tried this recipe without any sugar and it just wasn’t right. The sugarless versions missed a certain flavor depth, plus didn’t froth as well. I went with brown sugar because of the roasty notes. Of course, feel free to try your sugar of choice. Coconut sugar could be delicious, as well.
Soluble Coffee – I’ve since made this recipe with regular coffee (I don’t currently have an espresso maker) and missed the richness you get from a more concentrated brew. Plus, soluble coffee can get super foamy when whisked, so that’s a big win.
Give it a try and let me know what you think!
Extra bonus: if you want, you can leave-out the coffee and just foam-up the heated soy milk and other ingredients. That’s actually quite divine. (oooohhh, now I want to try it without the coffee, but instead, a shot of kahula. You can slip the shot in after your foam-up the pumpkin spice soy milk.)
Add soy milk, brown sugar, cinnamon and pumpkin to a sauce pan
Warm-up on medium heat, stirring regularly to incorporate as the ingredients come to a simmer (light bubbles, but not boiling… you don’t want to scald it)
Take a moment to enjoy the wonderful aroma (yes, go ahead… it’s part of the experience)
Ladle the hot liquid into two small mugs or one large one, leaving about 1/2 – 1 inch space at top for foaming action
Submerge the electric wire wisk and blend until you get the right level of foam; taking care not to spill the hot latte on yourself. I like to keep the wisk head submerged and then move it up and down in the drink about without removing it from the liquid.
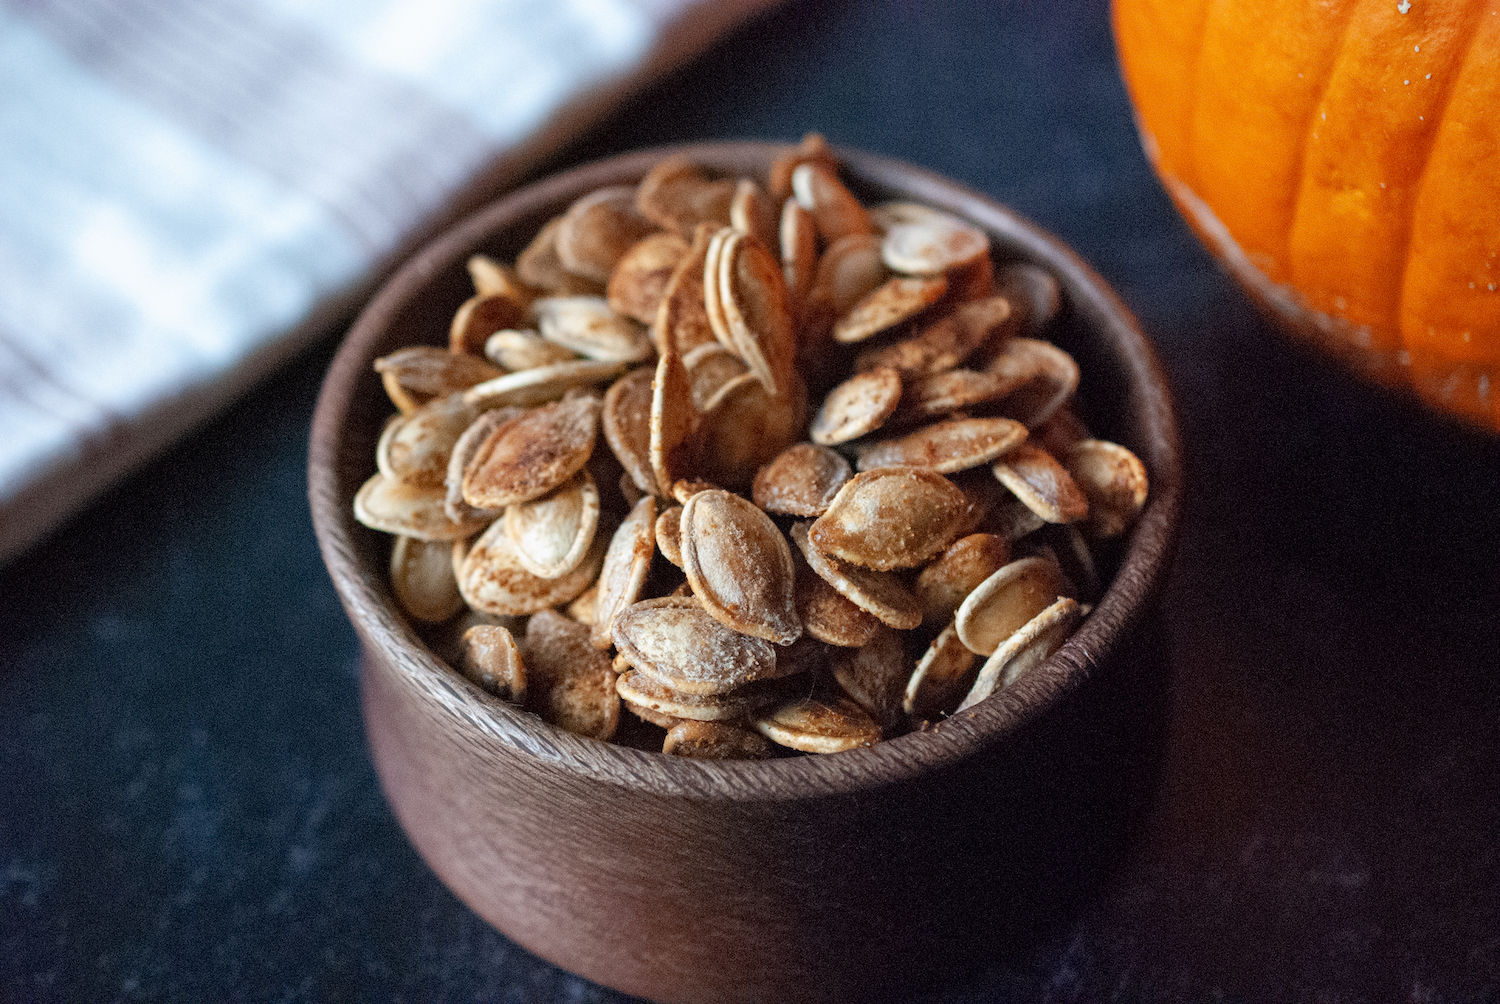
When our kiddo begs to get yet another pumpkin this time of year, I always excitedly say “YES!” Sure, silly jack-o-lanterns are fun and festive decor. Plus, if they avoid the carving knife, they’ll transition nicely till Thanksgiving. Yet, I’m even more thrilled about digging through the gooey guts to make the best baked pumpkin seeds.
Sure, making pumpkin seeds isn’t rocket science. Have you found the best baked pumpkin seeds yet? Trust me, I’ve got an extra step that makes them phenomenal. Sometimes, when you make pumpkin seeds, they can turn out a bit tough. Or, sadly, not crunchy. Come on… they’ve gotta be salty, flavorful, and crunchy!
The Secret Behind the Best Baked Pumpkin Seeds
This recipe contains one extra step, but it is quick and totally worth it. Instead of just cleaning the seeds, seasoning them, and dumping them on a tray to bake, I also boil them in super salty water. Simply add 1/4 cup of salt to 2 cups of water and bring it to boil. Dump in the seeds and boil them for about 5 minutes. You’ll know they’re ready when the seeds start to get saturated (darker).
Once the seeds are done, add them to a baking sheet. You can simply sprinkle with about 2T olive oil and a 1T mix of your favorite seasonings. I love using garlic powder, onion powder, and cumin. You don’t need more salt… you already added that during the boiling process. Mix the seeds, oil, and seasoning on the tray and add to a 300-degree oven.
There is a wide variety of oven temperature recommendations in pumpkin seed recipes. You’ll see some as-low-as 250-degrees and others up to 400. The higher the temp, the shorter the cooking time. I like 300 for about 35 minutes because this low & slow method helps ensure your seeds are crispy throughout.
Looking forward to hearing what you think about the recipe. I’m confident they may be some of the best baked pumpkin seeds you’ve ever had!
I love pumpkin seeds. Yet, I’d always been disappointed with the options. The ones you can get in a convenience store are super crispy, but lack flavor beyond salt. Traditionally, I’ve baked seeds at home with tons of flavor, but they lacked the crackle and deep-down saltiness of the standard bagged seeds.
A few years back, I’d read somewhere that boiling them in salted water can help. (Wish I could remember where I saw this because I’d happily source them here… but it was well before the internet and likely from a magazine scrap.)
OMG… this tip changed how I enjoy homemade pumpkin seeds for life! Even better, my husband, stepdad, and kiddos all love how they turn out. Not spicy, but flavorful. Salty, but not overly. Simply just right.
Ingredients
Scale
Seeds from one pumpkin (about 1–2 cups)
1/4 cup salt (to boil the seeds)
2 cups water
1T seasoning mix (I used a mixture of garlic powder, garlic salt and cumin)
2T olive oil
Instructions
Preheat oven to 300-degrees
Pull fresh seeds from a pumpkin. Ideally, one that was cut for a jack-o-lantern or making a pumpkin-based recipe. You’ll get anywhere from 1-2 cups per pumpkin. Of course this, varies.
Place seeds in a bowl of water. Wash the seeds by rubbing them between your hands. The pulp and goo will fall to the bottom of the bowl and the seeds will float.
Use your hands to remove the floating seeds from the cleaning bowl. Place them directly into a pan with 2 cups of boiling water and 1/4 cup salt
Boil the seeds for about 5 minutes. You’ll notice that they will become slightly saturated / darker. That means they’re done.
Strain the seeds from the water and place directly onto a baking dish.
Drizzle the seeds with 2T olive oil and sprinkle with about 1T seasoning mix
Place into 300-degree oven for approximately 35 minutes, or until the reach your desired level of ‘toast’
Let cool & enjoy!
Notes
Feel free to adjust the seasoning to fit your taste. The recipe recommends about 1T of seasoning total, so you can play a bit. Of course, I’d LOVE to add a bit of ancho chile powder, but my family would freak out. 🙂
You can also use butternut squash seeds (or really, any squash) with this recipe.
Typically, we eat these seeds straight, but they’re also delicious added to salads or sprinkled on top of pumpkin muffins.
If you’re looking for another healthy snack recipe, try my super craveable snack bars I wrote for RAISE Magazine: Healthy No-Bake Oatmeal Bars
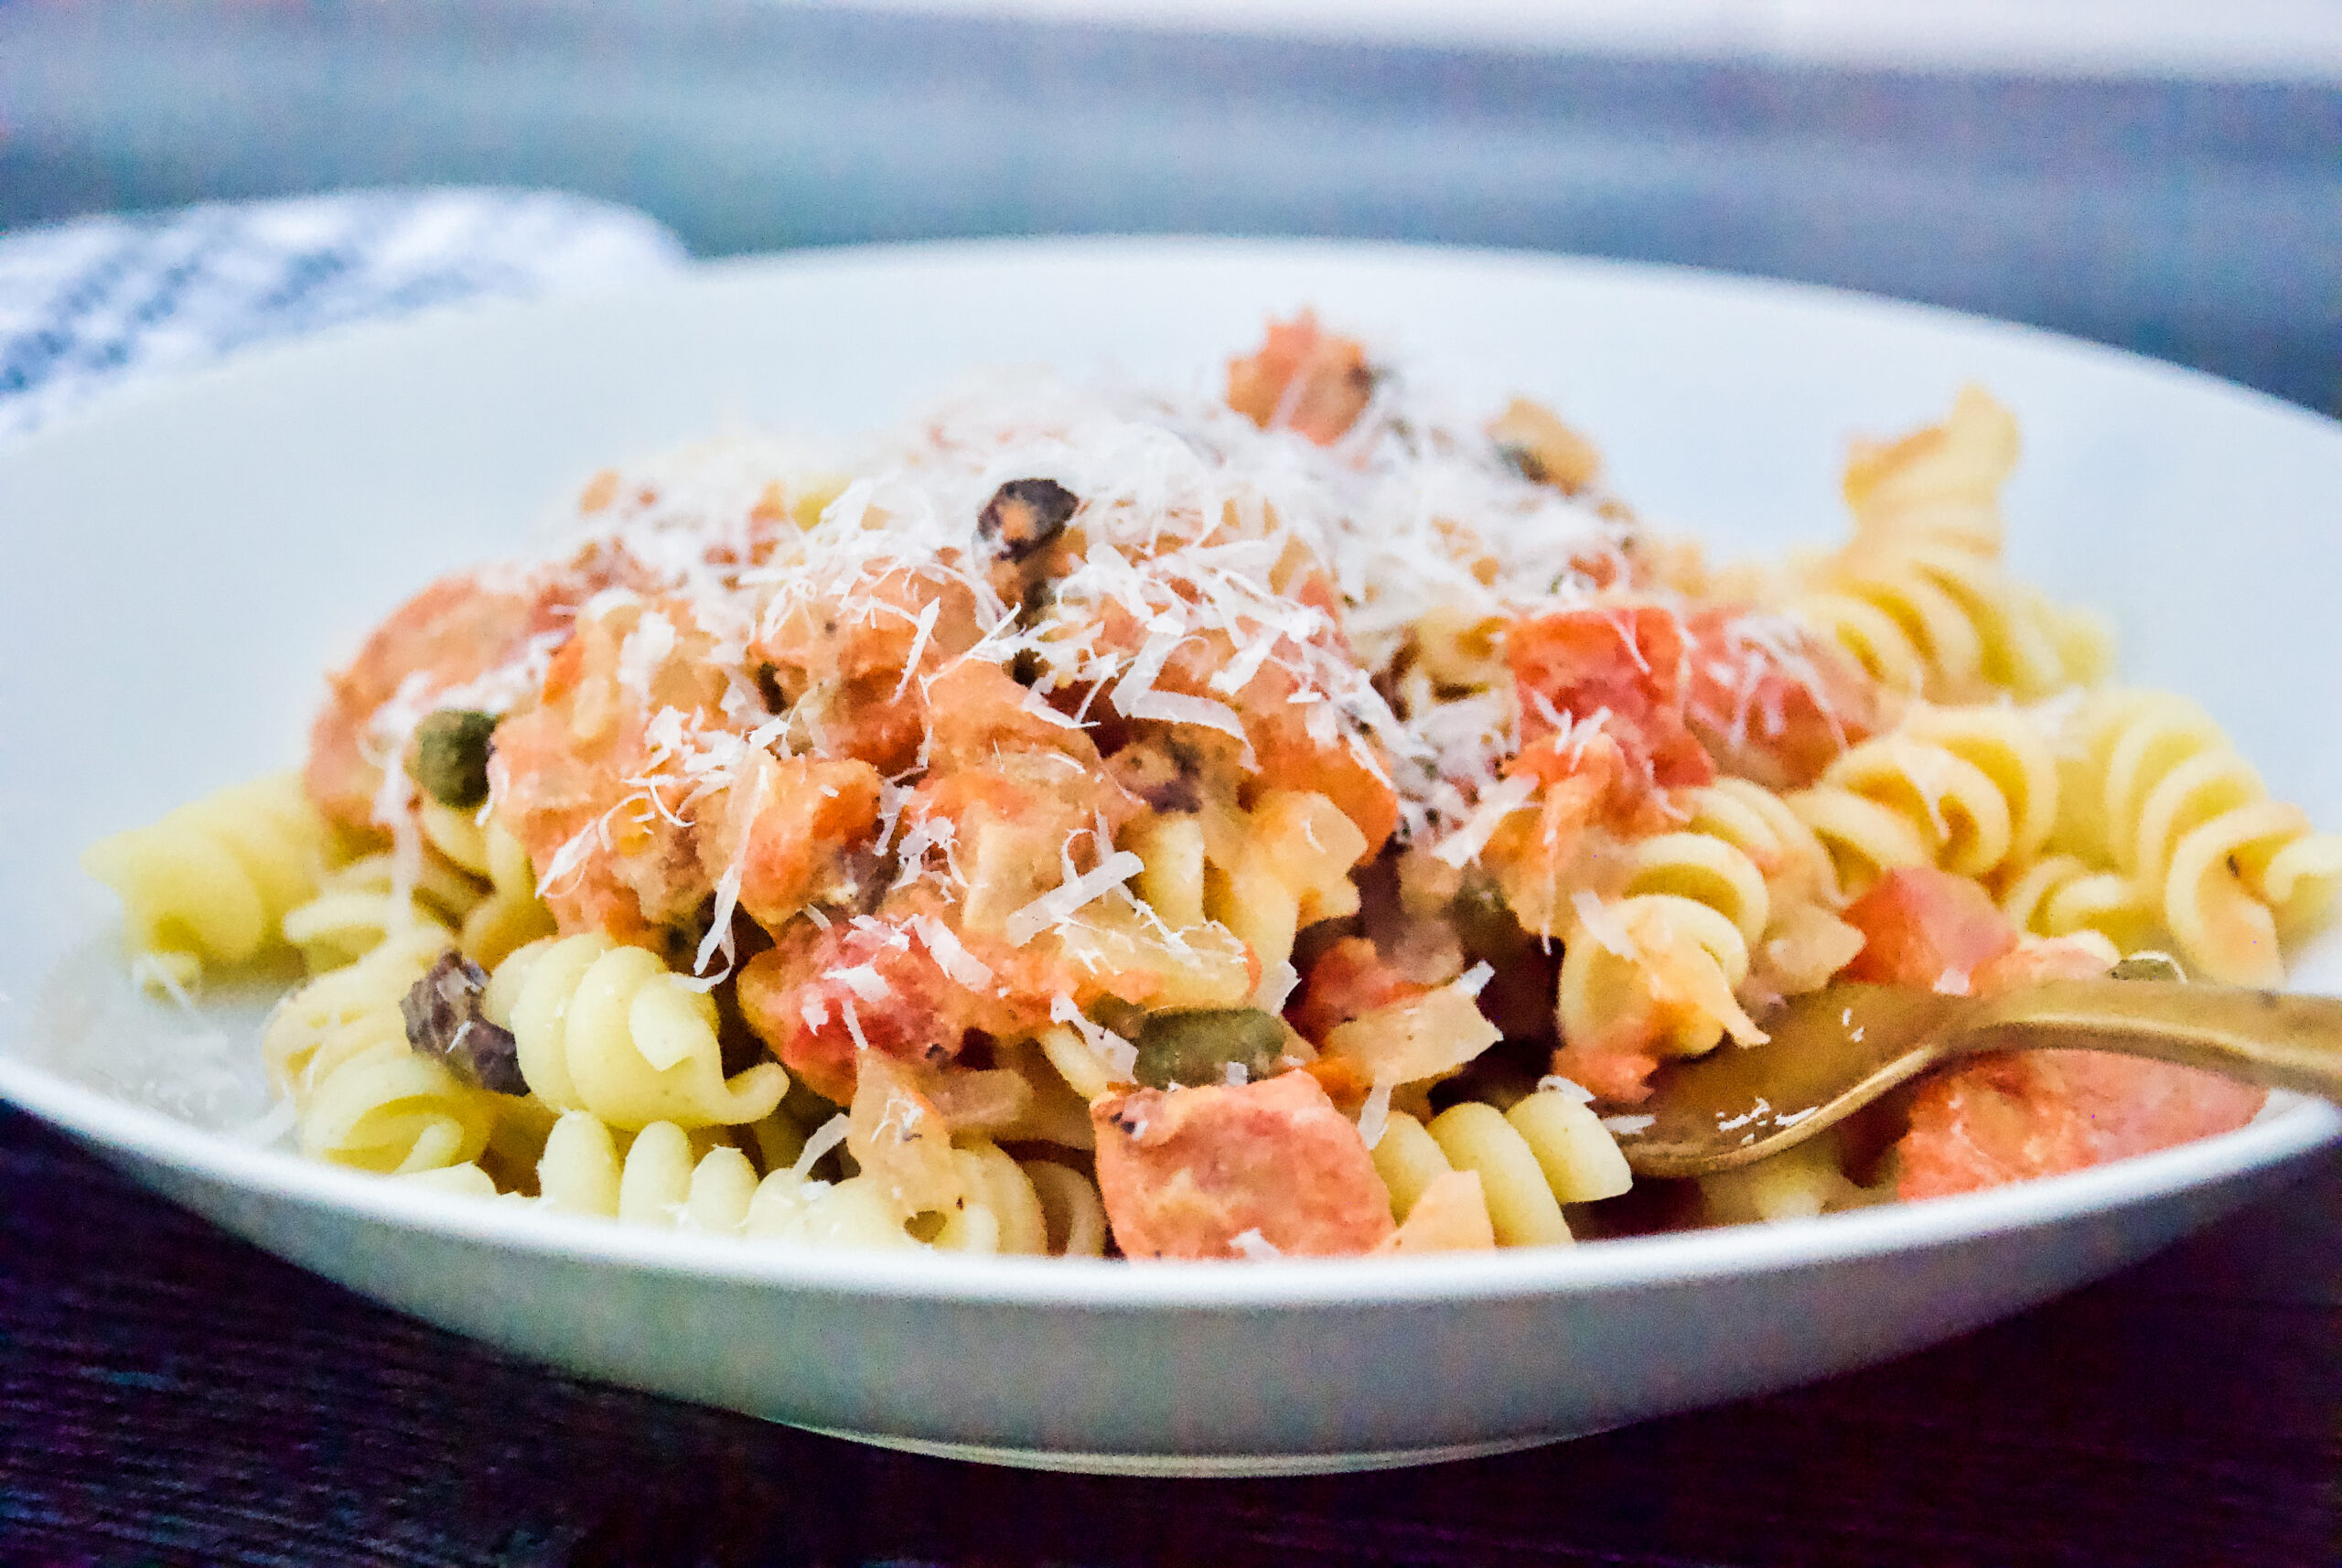
You know how you have THAT favorite recipe that your mom makes? The one that you hope she makes every time you visit? For me, this is THAT recipe… her Salmon Pasta.
Totally decadent, but somehow you don’t feel guilty eating it because it has salmon, tomatoes, onion, garlic, capers, and olives. All completely delicious and manage to check a few things off the “I should be eating this list.”
Now that I’m older, I appreciate this recipe even more because I know that salmon and tomatoes are phenomenal for my skin. Sneaking those ingredients beyond grilled salmon or a salad with tomatoes is a welcomed addition to my weekly menu.
This recipe is also fantastic year-round. Light enough to enjoy in the summer, yet also rich and flavorful enough for any winter menu. Serve with a chilled rose in warmer seasons and a nice pinot noir when it’s chillier to heighten the seasonal pairing.
THE ORIGINS OF MOM’S SALMON PASTA
My mom is famous for her scratch-based cooking style. Heck, we didn’t have a single frozen casserole or dinner-in-a-box while growing up. (However, we did have a curious supply of Lean Cuisine boil-in-bag Chicken a L’Orange at times in the freezer.)
This Salmon Pasta recipe is something she perfected through the years. Likely due to a solid supply of fresh-caught salmon via my uncles who loved to fish in Northern California. We grew-up with our share of grilled salmon, but this dish is something I grew to crave even more as I got older.
It has the garlic-onion-olive oil base of so many delicious traditional pasta recipes. Then brings in coastal Mediterranean / Spanish inspiration with olives and capers. Add-in a touch of heavy cream and you eyes roll back in your head with rich delight.
Fresh salmon is ideal, you can also use thawed frozen fish for the recipe. I even tried it once with a high quality canned salmon and things ended up delicious; albeit with a stronger salmon taste.
A PERFECT RECIPE FOR PICKY KIDS AND FOODIE PARENTS
I get it… your kids may not dive into a bowl of salmon pasta. Yet, that doesn’t mean that you shouldn’t be able to enjoy such a wonderful dinner.
There are a few options that will make this a complaint-free meal in your home:
Give your kids simple pasta while you delight in the culinary goodness of the recipe.
Separate some of the sauce for your kids prior to adding the salmon.
Substitute cooked chicken chunks for the salmon.
Vegetarian household? Great Northern white beans can be added instead of the salmon. Gives you protein without competing with the flavorful sauce.